I'm finally tackling the walk-in closet that I have wanted to create by converting the small sleeping room that is across the hallway from my bedroom, into a closet. The room is a very small room by today's standards measuring only 12 feet long and approximately 8 feet wide. So its ideal for a walk-in closet & solves the problem of the master bedroom not having a built in closet.
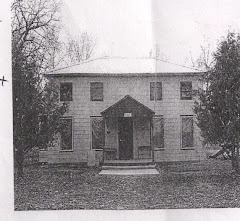
I had to begin by removing all the things we've had piled in the room, so that I could begin refurbishing the walls, which are original plaster walls from when the house was a hotel in the 1890s.

The original wallpaper was quite "busy". Far too busy of a pattern for the size of the room, in my opinion.

So I'm hoping this new paper will work better in the space. Its nondescript, but I think that will work best for the back wall of the closet area.

The next step is to remove the old plaster on the south wall (Carefully) and to also remove the old window frame & glass. Its our intention to completely wall off this area & remove any evidence of a window. No need for the window in the closet. 
Once I have successfully removed the old plaster & the window, the task of installing new sheet rocking begins. Then we will install the support boards that will be mounted at both ends of the closet & hang the brackets that will hold the pipe that will function as a closet rod.
I've long wanted to have a cubical section in my closet & yet wasn't sure how I'd do it without spending a chuck of money on some new cubical section that is made ready to install. While there is nothing wrong with that approach, it defeats my efforts to use as much reclaimed & recycled as I can. But then it occurred to me. I have perhaps the perfect object sitting in the house already. Its a solid wood headboard that we've used on-end as a tall narrow bookshelf. Its ideal for what we are needing & can easily be painted to fit into the paint color that will be used in the closet. Its also large enough for the largest hat box we have (as shown in the photo). An added bonus is that we can readily drill the hole through the upper section to slide the closet rod through & thus give the rod extra support with the wood frame of the shelving.

The closet section will also have a wire shelf mounted a few inches above the closet rod, going the full length of the closet so as to provide a place to readily store the hat boxes (shown in the photo).
Another design aspect I am looking to add is a wall section (where the window currently resides) that will be more shelving, so that we can place show boxes & other organizational containers at the end of the closet. These shelves will be placed above the built in dresser that I have that is a reclaimed buffet that's legs where cut off. It, like the old headboard will get a new coat of paint so that it looks like it belongs.


.jpg)


The best part of remodeling is that you are documenting it..it is nice to see the transformation :)
ReplyDeleteSalaams Anisah:
ReplyDeleteGood for you! Hopefully, your walk-in closet won't look like mine. Everytime I open the door, I shut it quickly, lol. It seems that everything ends up in there, lol.
Ah, plaster walls ... I have one that has started to crack apart. They say it is VERY messy to deal with, i.e., the dust and all.
Have fun with your remodeling!