Thursday, December 24, 2009

a splash of color


I came across a fabric that I liked quite a bit, so I decided to use it as my "wallpaper" border in my kitchen.


The print on the fabric is a blue & white checker pattern, with an overlay of sunflowers, which gives it a bright summer theme. Its a nice pick me up in my almost windowless kitchen.

So I finally have an additional color besides blue to work off of. I believe the blue & yellow will give the kitchen a nice summery color tone overall. At least that is my goal.

Sunday, November 15, 2009

Winter skies

The dark fall/winter skies are upon us & it gives me a chance to see how much difference the white paint in the kitchen helps the GLOOMMY lack of lighting.

My next task once a have a day off is to finish painting the dark kitchen cabinets & trim boards.

Have been contemplating what color the ceiling tiles (which later will be yanked out & replaced) should be painted so as to reflect light more. I'm thinking that a yellow tone would be good.

I found a fabric at a local store of sunflowers & blue/white gingham print. Its attractive & summery in its design & I believe I will use it to prighten the otherwise generic kitchen. Its country design works well with our large country kitchen also.

Monday, October 26, 2009

The painting of Brick


I finally did it!

I finally committed myself to painting the red brick wall in the kitchen white. My reasoning was simple. I need more light to reflect in the room, not be absorbed by the red brick wall.

The paint I picked up at the Habitat ReStore in Brookings. Its new cans of paint donated by a local store to the ReStore. It has a very low vapor level which is making it ideal for my fall painting project in the kitchen.

An added bonus to the light reflective quality of the painted wall is that my copper collection, which hangs on the wall stands out more now & so the white background emphasizes the details of the pots & pans & molds that are displayed there.

The kitchen's brick wall

http://photos-e.ak.fbcdn.net/hphotos-ak-snc1/hs204.snc1/7121_1146986310471_1101935959_30380684_5268988_n.jpg


wasn't the only surface needing a coat of white paint though. The cabinets in the kitchen were dark brown wood stain. While I managed last summer to get the upper cabinets on the west wall painted, I still have to paint the cabinets above & below the built-in ovens & the cabinets at the island.

http://photos-d.ak.fbcdn.net/hphotos-ak-snc1/hs027.snc3/11441_1151170575075_1101935959_30390553_3424604_n.jpg


Also I'm looking at painting the dark paneled south wall of the kitchen & the yellow paneled north wall that sits on either side of the now white brick segment.


http://photos-c.ak.fbcdn.net/hphotos-ak-snc1/hs007.snc3/11441_1151170735079_1101935959_30390557_1218753_n.jpghttp://photos-c.ak.fbcdn.net/hphotos-ak-snc1/hs007.snc3/11441_1151170855082_1101935959_30390560_6166395_n.jpg


What to do with the ceiling tiles is another matter all together. One that will have to wait until next spring so as to allow us to open up the house so we have good ventilation as we pull down the tiles & have the certain cascading of decades of dust that is sure to be collected above the tiles.

Its one of the challenges of my remodeling project. As an asthmatic, I have to always be vigil about the production of dust & recognize that too much will cause me to become unconscience regardless of where in my project I am at. So since we live in the house, while at the same time I'm remodeling piece by piece the various spaces within it. My need for low dust production is critical.

But progress is being made. Piece by piece we see improvements.

Wednesday, October 21, 2009

What to do with a narrow hallway


Working with a house built in the 1840s can be intriguing & a challenge. One aspect that I am dealing with is the narrow, 31 inch wide hallway of the upstairs. It leads to the master bedroom and two former sleeping rooms that are 79 inches by 107 inches in size.

The public would basically never have to traverse the hall, as its part of our private living space. However, I still need to determine how to address the appearance of the walls.

One sleeping room has been refurbished to become my office & sewing room. We've gotten the wiring finished in the room. Placing the wiring high on the walls so as to easily access the outlets for computers & such. I used square conduit & external outlet boxes.

The other former sleeping room is now destined to become a walk-in closet for the master bedroom, since it is directly across the small hallway from the bedroom.

With this configuration of rooms, traffic into the hall is pretty much limited to private family members. Yet those family members aren't small people. My husband, Eric is over 6 feet tall & when he walks into the hall no one is going to be passing him in the hallway as there just isn't any space to do so.

The walls of the hall were previously plaster, but we removed the old plaster & replaced it with sheet rock. This illimated the mold embedded 100+ year old plaster, duster & lathe immediately improving the air quality in this area.

The next task was to decide the wall covering.

I opted for wall paper on one wall & paint on the oposite wall.

The first section of new wall paper went up last night. Which you can see in the photo. Its a basic off white striped wall paper in vertical format. Nothing fancy, but a tad better than the previous look in the hall, to say the least.

Sunday, October 18, 2009

Curb appeal


Flower Boxes:


Its been my goal to build flower boxes & hang them from the 8 front windows. I'm not seeking to have live flowers in the boxes, but rather to utilize some of the reclaimed cloth flowers I can obtain from friends & perhaps Freecycle.

I used cloth flowers & vines in my hanging wire basket arrangements that I have hanging on the front porch posts & it is these arrangements that inspired me to create the window boxes.


I've enjoyed how they have worked over the last two seasons. Lasting far longer than live would & fading far slower than I expected. The nice aspect of the window boxes is that I can take the most faded flowers from the lower boxes & baskets which are nearer to the public view & move them up into the second story boxes as filler, long before they have to be discarded completely.

So, with this concept I began building this summer a couple of flower boxes to test. I took the scrap wood from an old privacy fense & cut them to the desired length with a circular saw. I nailed the box together & secured a plastic screening on the bottom of each box, then re-enforced the bottom with lathe strips.

I mounted the two completed flower boxes on the outside second story windows & filled them with straw, then the flowers.

Its my intention to see how the flower boxes & flowers handle the winter winds, as well as ice & snow coming off the roof. If they are successful, I will finish building the other 6 boxes & mounting them as well.

I wasn't sure that I'd have a chance to mount them before winter, but we had a dry day just in time for me to get out & climb the ladder & mount the boxes. While it will look sorta strange to some, to see flowers "blooming" in the dead of winter... for me the importance of determining the viability of my design makes the situation worth it.

I'm hoping to be able to change the colors & theme of the boxes as the seasons progress, with Spring, Summer, Fall & Winter decoration themes. Time will tell.

Saturday, October 17, 2009

The IDEA

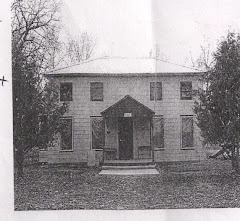
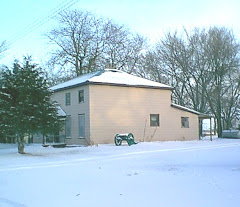
The concept or Idea I have in regard to the building is somewhat complex. I am seeking to not only take this old 1840+ stage stop/hotel & turn it into a modern sculpture gallery, to showcase Eric's work --- But I also want to make it modernly convenient & energy efficient, as well as have the yard designed in such a way to be very much a part of the living space.

I seek to do this with as little money as possible for numerous reasons. THe first being the challenge of the idea! Its easy to buy a finished building & add a few coats of paint here or there. Or to design from the ground up to create the structure you want. But to take an old half neglected building & transform the ugly duck & make it into a beautiful swan......

That to me is truly the challenge.
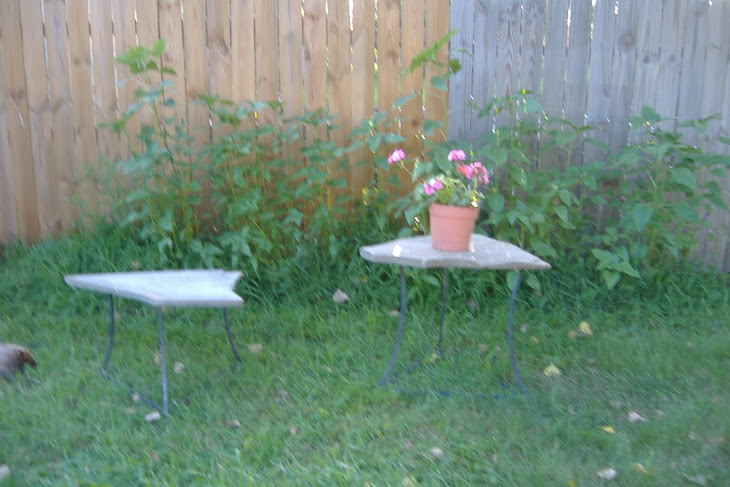
The Yard:

I have a yard that has been neglected for years, which provides me with a blank slate with many opportunities. From a shaded, bare, narrow area along the eastern side of the building, to the large sun bathed western section on the opposite side of the building that is covered in grass. Then there is the back yard with its heaps of left over trash & debris from the previous occupants & the over grown trees & tree stumps from ancient grandmother trees that once resided in the back yard that overshadow the sparsely growing grass underfoot.

The Kithen:

The Kitchen too has many challenges & has much potential. A large open rectangular kitchen with an ugly dark green cooking island in the center setting central in the kitchen that's floor can best be described as "lumpy" due to the crumbling of the cheep 1970s particle board flooring material that was used as underlayment under the vinyl flooring. Closer investigations, we learned that 95% of the wiring was still the old cloth wrapped wiring, so ALL the power had to be shut off & each electrical socket had to be traced back to the breaker box to confirm that sliced "modern" 70's wiring was not sliced into the early cloth wrapped along the route (as had been discovered earlier). So we find we have 3 outlets save to use in the entire kitchen until the remodel of the room can address the wiring issue.

There are two elements in the kitchen I like & hope to be able to keep.

1) the original high counter along the west wall which was part of the old cafe area.

2) the brick faced wall near the chimney, along the north wall, which gives the room a nice aura.

There are many aspects that will change in this room however:

1) the flooring.... while the original solid wood flooring exists under the crumbling layer of particle board, we need to place over it a layer of flooring material that can be used to level the floor.

2) the need for more natural lighting. The room is nestled in the center of the house with only one small 2 foot by 2 foot window along the west wall, above the sink. Due to the building being a two story structure, a sky light is out of the question. But a large picture window facing to the south, toward the future 3 season porch (current back porch) is a viable solution, which would allow a flood of sun light into the room.

3) the lack of ergonomic design. Currenly the layout of the kitchen is less than suitable for the natural movement of a cook in the kitchen. There needs to be an over-haul of the layout so as to place all the primary appliances more accessibly in the triangular design of a good kitchen layout.

4) The need for space design in the cabinets. Currently the large spacious cabinets. I'm researching the products available that can allow me to utilize the current cabinets more efficiently. I'm leaning heavily toward the ClosetMaid products due to their easy installation of wire based organizers. I'd like to find out however if their products are made from recycled metal. One of the benefits of using metal products is that most metal is recycled & rarely goes into the landfills in America. So even "new" steel is often smelted down scraps of metal due to the very nature of steel.

Access of the Bathroom:

Another down side to the current kitchen is the location of the bathroom door. The bathroom was installed in the 1970s and was simply a small section of the back porch walled off & plumbed to accommodate indoor plumbing. Its location was apparently selected out of convenience to the kitchen plumbing. However this design had some set backs. One of the biggest being the lack of adequate protection for the pipes to the bathtub which are along an exterior wall. Two of the walls of the bathroom are uninsulated exterior walls of the former enclosed back porch, which were paneled with 70's bathroom paneling & topped off with a suspended ceiling.

The bathroom door opens up into the the narrowest part of the kitchen, next to the oven & island range. Making a traffic disaster in the least desired location.

With a bit of discussion, it was determined we could relocate the bathroom across from its current location, in the current main floor bedroom. The room has already been determined to be the new home of the Kitchen Pantry & the laundry area, so plumbing pipes will already be going into that area. Additionally it places the downstairs bathroom directly below the future upstairs bathroom; reducing the amount of plumbing pipes that will be needed for either project since they will be able to be tied into each other.

By relocating this main floor bathroom, we will be opening up a section of the wall along the south side of the kitchen, which then can be used in the realignment of the kitchen cabinets & appliances.
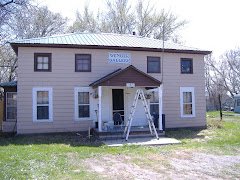
The Entry:

The entrance into the old hotel brings people face to face with a long & steep staircase.

The stairs are hallmarked by the presence of a 2x4 hand rail. The "rail" is literaly nothing more than a 2x4 nailed up against the 4x4 post & secured part way up the staircase that allows it to be anchored.

The staircase has lots of old history, but whether we want to replace the worn treads is just one of the questions we face. We've managed to find at the Sioux Falls Habitat ReStore oak railing and spindles that will replace the 2x4.

The wall too needs major work, along the hallway. Still made of the old horse-hair plaster which is as hard as concrete, the wall is witness to some pretty horrible patch jobs & a very unevenness.

When we first purchased the building, the hall wall had a coat rack mounted the full length of the narrow hall that went from the front door, along the staircase, back into the kitchen via a second interior hall door.

We soon removed the board with all the mounted antique coat hooks (though we saved the coat hooks).

Additional to the coat rack element, the hall way is the home to the electrical box wich stands prominently the widest point of the hallway, on the west hall wall. We've concluded that we will have to conceal it behind a built in cabinet so as to make the area a bit less like a utility room & more like the entry way.

The original parlor entrance was boarded up by the previous owners, and was quickly reopened. It took most of the summer before a suitable glass interior parlor door was found at the ReStore and another 6 months before we had the time to shave down the solid wood framing on the door to meet the narrow door requirements of the old door frame.

Now as one opens the front door, they see through the parlor door glass windows to the Red Gallery, which beckons them forward.

Another change we made was the exterior door itself. Previously a hallow core door with three small windows that reminded me of only too well of a trailor door, the entry way was far from inviting. So we changed the door, purchasing a more efficient exterior door that had a large square window in the upper half of the door.

This door resolved our natural light issue in the hallway, yet maintained a traditional look suitable for the structure.

The next thing we did, was add a bit of color. Not at the door, but just within. From the curb most customers wont notice anything unusual. However, as they approach the door they see within a BRIGHT RED staircase! This was accomplished by painting the stair's risers with bright fire engine red paint. Its the first hint that the things found inside will not be the typical art found in the area.

Throughout the house & yard of the Gallery house, we have this balancing act needing to be played out.

We recognize that the area residents aren't necessarily ready for "weird", but we aren't going to be selling the typical style of yard ornaments or gallery art. The work is contempary work with roots in tradition & history. Yet going forward in a new direction. So the landscaping & the remodeling must send through subtle message, the same concept.

Using recycled materials is just part of my nature, but it also blends well with the artist's approach to his artwork & the trend in today's world to look toward resource renewal & reclaimation.

I will speak further on these & more aspects of the remodel project in days to come.

Thermal Drapes


Well I just recieved & installed my new thermal drapes for the Red Gallery & the Blue Gallery, which I ordered from Seventh Avenue.

I chose the bordeaux for the Red Gallery, and a previously available blue colored thermal drape for the Blue Gallery. With the economical price of $20.99 the price made it a good purchase.

Already we notice a temperature improvement inside the building which can only be attributed to the thermal curtains since the outside temperature had been hovering at the approximate same temperture for days.

With the warming temperatures outside today, we found it necessary to open up the drapes and allow for the escape of some of the heat trapped by the thermal drapes.

I would strongly recommend thermal drapes to everyone who is trying to save energy & thus money in their heating bills, whether they live in an apartment or a home. I like the linen like look of the drapes as well. DUring the day, I will be able to have attractive upscale sheers showing from behind the drapes, allowing much wanted winter light in and maintaining privay. The sheers have yet to be found that fit the needs of the gallery.

I want something that suits a contemporary setting & yet provides us with easy maintenance when it comes to laundering and looks good in all the windows since the sheers will be the same in both the Blue Gallery & the Red Gallery.

Friday, October 16, 2009

The Old Hotel


Today begins the record of our little endeavor on Main Street, Bushnell, South Dakota.


It started a couple years back, when a neighbor indicated he was going to put the old hotel he owned, on Main street, up for sale. The building was built in the 1840s, originally as a stage coach stop & was located in Fountain, South Dakota about 10 miles to the northwest of where it now sits. But within a few years, it was determined that the railroad wasn't going to go through Fountain, but through Bushnell. So the owner of the building moved the structure, using horses and wagon to Bushnell & placed it where it now sits.


Since that early time, the building has experienced many renovations & additions. One of the most dramatic was the cacoon-ment of the original building, when an addition was added to the old building & it was doubled in size. The original shingle roof of the first structure can still be found in the attic, intact.


Later the building existed as the area hotel & later still as a cafe. Then later still it functioned as a rental home for the local potter's apprentice.


Then we purchased it with the dream of establishing a sculpture gallery & garden.


So the remodel begins.


Not only are we dealing with a desperately needed interior remodel. The exterior of the building & even the yard & old one car garage desperately need an over haul.


This blog is my attempt to share with friends & family our endeavors & the small discoveries a remodeling project like this provides.


Search This Blog